Showing posts with label easy. Show all posts

Wednesday, June 10, 2020

Cinnamon Rolls

As I mentioned before, this was never meant to be a cooking or baking blog, but alas. Facebook has been inundating me, and probably everyone else with recipes. I wonder what makes them think we all have time to cook and bake? You'd think there was a pandemic, and we were all bored while sitting around at home. Having said that, I must admit, I've looked at some of the recipe offerings and I've even tried a few.

Today, I made easy, healthier, crock pot chicken and dumplings thanks to Allrecipes.com. It was a pretty good lunch. Then, I made some zucchini pancakes, and the following cinnamon rolls.

I'm sharing this method of making cinnamon rolls, which I discovered under the heading "Newfoundland Recipes" because it was incredibly easy, quick, and delicious. Although I'm certain most people in my age group have probably made variations of cinnamon rolls before, I haven't...until now. I suppose I always thought the process to be much more complex.

I will share the recipe here, and what I learned. I absolutely would do several things differently, having completed this once. In fact, I think it would only take one more batch to perfect these. Now if only someone would eat up all of the first platter so that I could make more.

Dough

2 cups flour
1/2  cup shortening
1 cup milk
1 tablespoon baking powder
1/2 tsp. salt

Mix ingredients together and roll out on lightly floured surface.

Filling

Mix together -

1/4 cup melted butter
2 teaspoons cinnamon
1/2 cup brown sugar (I used brown sugar substitute for part of this)

***What I learned - I would probably add nuts or raisins to this filling next time. Also, do not spread filling too close to edge because it oozes out while baking.

Spread filling onto rolled out dough.
Now, here's another of my regrets. I rolled up the dough lengthwise until it looked like the rolling pin.  I suppose I was afraid it would get too thick. Next time, I will roll it in the other direction. The buns need to be a bit bigger than what I made. Also, I cut one inch slices. I found them to be too small. So, in my opinion, thicker and fatter is better.
Place on parchment lined cookie sheet but not too close together. They do tend to get middle age spread. Bake at 350F for 20-30 minutes until they are lightly browned and done looking (not at you but done looking to you...as in not raw).

After you bring them out of the oven, brush on glaze while rolls are still warm.

Glaze

1 cup icing sugar
2 tblsp. milk

So here they are...my first attempt. Not pretty, but very delicious.


Thursday, June 4, 2020

Empire Cookies...a favourite


Empire Cookies

From what I’ve read, empire cookies originated in Germany and are a form of linzer cookie (the ones with the cut out on top and various jams inside). Later they were adopted in other countries in various forms, but they are basically supposed to look like a little crown. 

This is one of my favourite simple cookies. I use the same cookie dough recipe for special holidays. I cut them out with seasonal cookie cutters, and decorate accordingly. In this case, I don’t double them up and I make the individual cookies a bit thicker. 

Basically, these are a sugar cookie and pretty easy. My original recipe came from Canadian Living, but I have made some adaptations as necessary over the years and they're my "go to" emergency cookie.

I prefer smaller cookies, because I’m a dainty person, and because after the effort, I want them to last for a few minutes before they all get eaten. I think that most recipes are similar, and when I google the photos, most look like mine.

The last time I made these cookies was in Atlanta, Christmas 2019 while visiting my daughter. I worked with what I had because there was no rolling pin, and none were available at stores. In the words of one sales person, “What do you use those for?” 

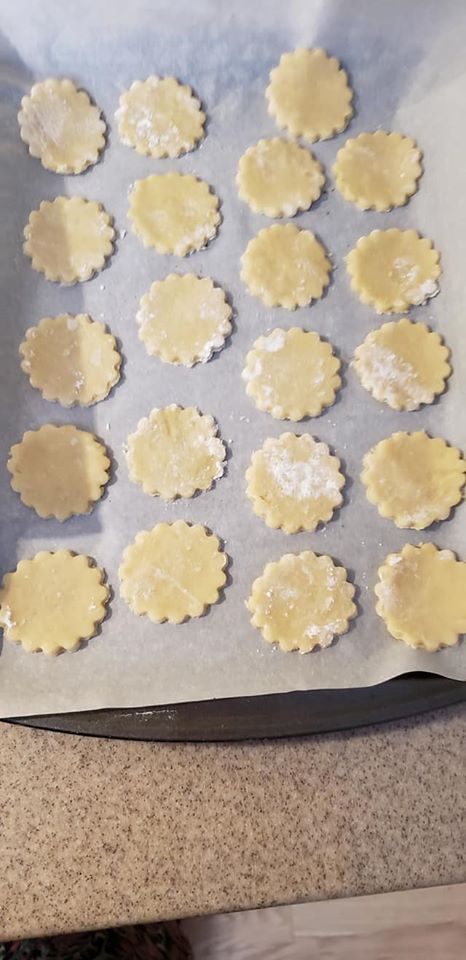
We did manage to find a vast array of cookie cutters on sale and there was one which I found suitable, roundish with wiggly edges, although regular round, or a small juice glass will work as well.

Ingredients                                                                          
1/2 cup butter, softened                                                        
1/2 cup sugar
1 egg                                                                                     
1 tsp. vanilla                                                                         
2 cups flour                                                                           
1 tsp. baking powder     


Filling & Topping

raspberry jam (for inside cookie)

1 cup icing sugar
1/4 tsp. almond extract
2 tsp. hot water approx. (add more by drops if necessary)

maraschino or candied cherries

Directions

Cream butter and sugar together until smooth. Beat in egg and vanilla. Combine flour and baking powder and add gradually to creamed mixture. On a lightly floured surface, roll out dough quite thin because, don’t forget they get doubled. Cut into rounds. Place on parchment paper or ungreased baking sheet.

Hint - I usually use a large cafeteria type tray to sprinkle flour and roll out the dough. This saves a lot of mess, and clean up later.

Bake 325 for about 7-10 minutes for small, or 10 minutes if you made larger ones. My oven runs hot. Don’t let them get brown...just a bit at the edges. Let cool. Spread half the cookies with raspberry jam.

Combine icing sugar, almond extract and enough water for a thin icing...start with less and add lest it get too runny. Frost tops of cookies. Put a small piece of cherry on top. I usually cut about 3 or 4 cherries into bits and dry them on a paper towel (not drying them will make the red bleed into the icing). Size of cookie cutter determines how many you get. I usually have a couple dozen.

What can I say...no rolling pin? Use a liquor bottle. Only problem is that it’s hard to get the dough really smooth and even harder to get all the dough off the bottle.

I'm not too fussy so they never look perfect. They still taste the same.                                     

Tuesday, May 12, 2020

Lazy Veggie Moussaka

I used to make eggplant parmesan. At some point, I lost the taste for it. I think the problem is that I'm not much of a tomato fan,  plus I got turned off by the incessant heartburn that comes with pregnancy and/or old age. I'll let you decide which category I fit into.

Details of my tomato aversion are in a previous blog dated 9/16/10 "You say tomato and I say bleeachhhhhhhhhhh.....".

I do not mind eggplant, and since Walmart curbside pickup sent two not one, and more zucchinis than I had ordered (a whole other blog), I tried a new recipe. It looks lengthy and complicated but it's not any worse than making lasagna. It's definitely more nutritious without all the pasta carbs, and just a bit of yummy fat.  Also, I learned that you need to be flexible, especially these days. So I bent over backwards...not easy at my age, and created this from what I had lying around the house...food items that is. Because I wanted to make it meatless, I looked up regular and vegetarian/vegan options. I combined ingredients and procedures that I found online, with my own ideas, then adapted and simplified the recipe because I'm lazy. It's a bit of a process, but not that difficult. It just has a few steps. Ingredients are in red letters. French terms are my attempt at chef-speak.

By the way, it was delicious. It can get a bit salty so be aware when adding this ingredient. Also,  please excuse my comments and asides. I can't seem to help myself.

***Fun Fact - I was curious as to what moussaka, a Greek word, means in English so I google translated it and you'll never believe it! In English, moussaka is....moussaka.

                                   
                                                      VEGGIE MOUSSAKA A LA HILDE

Prepare and set aside the following while preheating oven to 400 degrees.

2 medium eggplants partly peeled and sliced lengthwise
3 potatoes, peeled, sliced lengthwise
3 medium large zucchini sliced length wise. Put on paper towels on a baking sheet, sprinkle with salt, leave 30 minutes to remove liquid and bitterness, then dry off.
 When eggplant is dried, put all sliced veggies on olive oiled cookie sheets and bake 20 minutes at 400 degrees.


Bechamel Sauce  (can be prepared while eggplants are salted)

Equal amounts butter (or olive oil), and flour (approx. 1/2 cup of each)
salt/pepper to your taste
3 cups milk (warmed...essential)
1/4 tsp. nutmeg

Instructions - In a large saucepan, melt butter or heat olive oil depending on your preference. Be careful not to burn. Stir in flour, salt, pepper. Stir with wooden spoon to create a roux. I think a roux is a fancy french cooking term for a combined lump of flour and melted butter. (see pic) Using a whisk, gradually add warm milk, whisking to prevent lumps. Continue cooking until slightly thickened, stirring with wooden spoon again. Add nutmeg.

Cover pot in wax paper to prevent layer of skin from forming. I put a lid on top of waxed paper. You can probably use plastic wrap or paper towels but I can't promise you'll remain skinless.

 
Lentil Sauce

Make this when veggies are roasting in oven.

Lentils  I used a normal sized can of green ones, drained and rinsed. They were nice and small. Buying dry, soaking, cooking etc. is too much work. I feel like black beans would work in this recipe as well, but haven't experimented yet.
1 medium onion, chopped
2 garlic cloves, minced
1 can crushed tomatoes - I used flavoured "Aylmer Accents" (made in Canada),
because I like it better...whole undrained can. No, they don't pay me for my endorsement.                                      ***Note to self - look into getting paid.
1/2 cup broth or water (if you want)
1 tsp. dry oregano
1/2 tsp nutmeg
pinch cinnamon
olive oil tablespoonish

Instructions - In a decent sized pan, saute (French for fry 'em up gently) onions and garlic in olive oil for a few minutes until it smells good. Add lentils, tomatoes or accents, broth or water (I didn't add any because I left the liquid from the canned tomatoes in there), and spices. Simmer for about 20 minutes.

Assembly - the fun part

I used a 9x13" casserole type baking dish. I know this for a fact because during covid isolation boredom, I decided to measure all my pans and write the sizes on the bottom with permanent marker.

Covid Query - Why are baking pans measured in imperial and not metric? Could it be so that they can bake in a Fahrenheit oven?

Pour half lentil sauce in the bottom of pan (hopefully it's not too runny...mine wasn't).  Layer the veggies in an order of your choice. At this point, if you want but not essential, you can toss a few specks of some kind of  grated cheese between the layers. I did, although I didn't use much. I just had a brief flashback remembering eggplant parmesan and the veggies looked a bit naked.

Pour remaining lentil sauce. Cover entire casserole with bechamel sauce and smooth it out. I hate wrinkly sauce don't you? The photo was taken mid smooth.
Bake in middle oven rack, still 400 degrees for about 45 minutes or until golden brown. Remove from heat and let stand for 20 minutes or so. I covered it loosely with foil to keep it hot. Cut into squares. Here's mine, right out of the oven.
Refrigerate leftovers for up to 3 days, I hope, because we're having them today after 3 days.


Saturday, January 18, 2014

Two-Bite Sized Potato Zucchini Latkes

I've been going through old recipes and watching in particular for anything that is vegetarian and can be created stove top. Although I've never been a huge fan of potato pancakes or zucchini pancakes, I came across this combo recipe which I remember making years ago. I believe it came from a Canadian Living magazine since their recipes are usually quite good and reasonably foolproof.

I thought the latkes might go well along side a particular soup I had made. They did...yum. They are also a good way to get extra veggies into the meat and potato eaters of the world. Serve with applesauce, sour cream or on their own, whatever you prefer. Combining the zucchini with the potato cuts down somewhat on carbs and calories. At a mere 36 calories a piece, eating three of these delicious morsels will not break the caloric bank.

This is a bit of a process, but they don't have many ingredients and they're totally worth it. I used some basic and ancient tools to help me and created the latkes start to finish in less than 40 minutes.

Ingredients

2 small zucchinis
3 medium potatoes (peeled)
1/2 tsp salt
half an onion (I like Spanish so I use about 1/4 if it's big)
1 egg
3 tbsp flour
Oil for frying (I used Canola)

Use a grater to grate zucchini and potatoes coarsely. I used this manual old fashioned kind  (on this larger hole side shown here) but I suppose if you have one of those new fangled food processor thingies, and like washing a lot of contraption parts, it'd work too and would save getting fingernail fibre in your food. Stop going ewwwwww...that was a joke.

Put grated zucchini and potatoes in a strainer or bowl and sprinkle with 1/4 tsp salt. Let stand for a few minutes while you finely grate the onion. Add to mixture. Drain, strain, squeeze or stomp out the liquid any way you know how.

It sounds weird but I have an old juicer...the manual kind and I just put scoops of the potato/zucchini/onion in here and squeezed. Good arm/batwing exercise and you'd be amazed how much liquid comes out. Dispose of the liquid and put mixture back in a clean, dry bowl. Repeat.

Stir in onion, egg, flour and remaining salt. Mix. Put oil in the bottom of a pan...don't be too cheap but you also don't want to drown your mini latkes. They don't need to be covered in oil...about a third. I used a couple of tablespoons, I'm guessing. I also used a wok like pan and it was narrower at the bottom so the oil seemed a bit fuller and not so spread out...less waste

Heat the oil. Using a tablespoon, scoop the mixture into the oil. Depending on the size of your pan, you might be able to make 4 or 5 at a time. They shouldn't touch or you won't get the nice crispy potato edges. After about 2 minutes, flip them over for another couple of minutes. Cook them hot and fast. Remove and place on a layer of paper towels to drain off excess oil. These really aren't greasy, I promise.

So here's how the photo looks that comes with my original recipe. I think my zucchini was shredded a bit finer but that's personal preference. Also, my tablespoon didn't create perfect muffin tin shapes like these.  ***Note to self - Consider making these in a muffin pan next time, or not.

Here's how mine looked. I served 3 latkes for each of us. There are many left which I have frozen for re-heating in the microwave another time. The recipe makes around 3 dozen. Enjoy. We did.